Introduction
How to clean motorcycle chain – Maintaining a clean and well-lubricated motorcycle chain is essential for ensuring optimal performance, prolonging its lifespan, and avoiding unexpected mechanical issues during rides. A dirty or poorly maintained chain can lead to increased wear, decreased power transfer, and even failure. In this guide, we’ll delve into effective techniques for cleaning your motorcycle chain, step by step.

Gather the Necessary Tools and Materials
Before you begin, gather all the tools and materials you’ll need. These typically include:
- Chain cleaner spray (specifically designed for motorcycle chains)
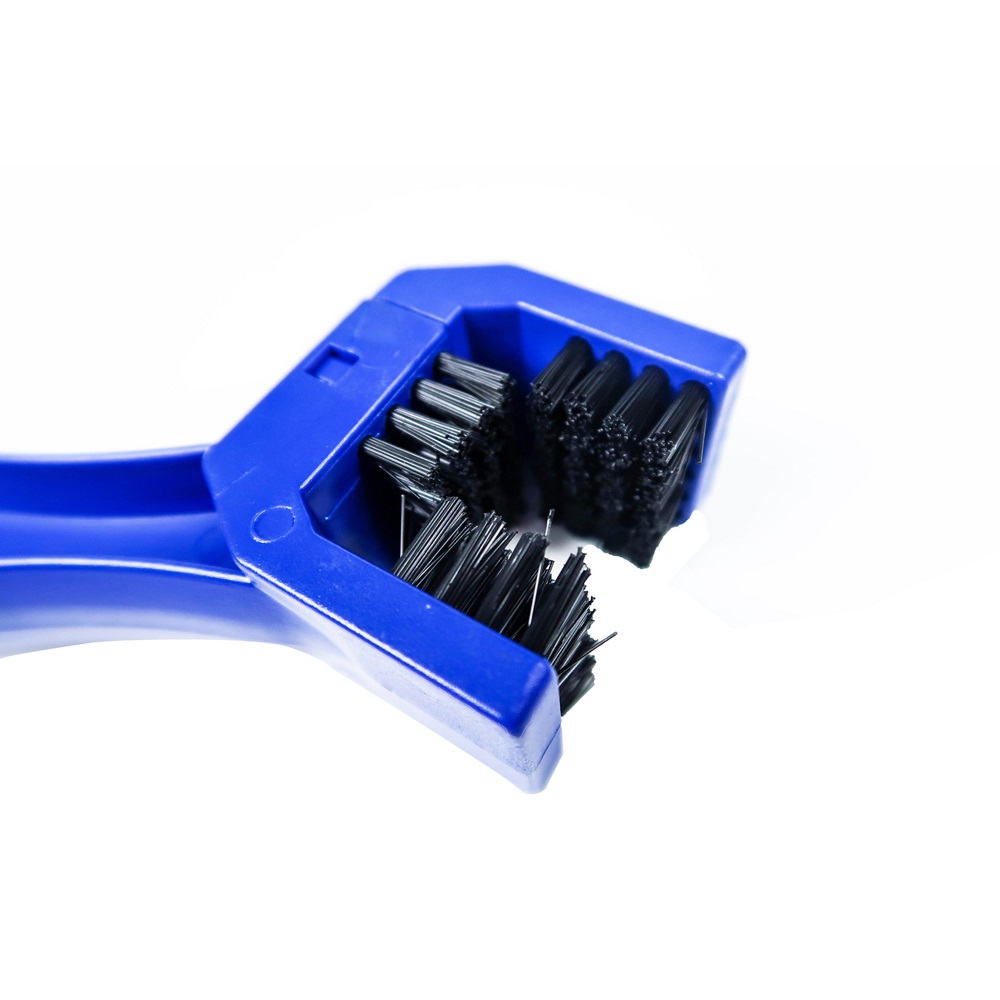
- A brush with stiff bristles (a dedicated chain brush is ideal)
- A clean rag or microfiber cloth
- Lubricant designed for motorcycle chains
- Gloves (to protect your hands)
- Eye protection (safety first!)
- A degreaser (optional for heavily soiled chains)
- An old toothbrush or detailing brush (for tight spots)
Park Your Motorcycle Safely
Find a flat, stable surface to park your motorcycle. Ensure it’s on the center stand or use a paddock stand to lift the rear wheel off the ground. This allows the chain to rotate freely without the bike being in gear or running.
Protect Surrounding Areas
Cover nearby painted surfaces, plastics, or the exhaust with old towels or plastic sheets to prevent any cleaner or lubricant from damaging them.
Rotate the Chain
Spin the rear wheel slowly using the motion of the bike or by hand, which will allow you to access every link of the chain as you clean.
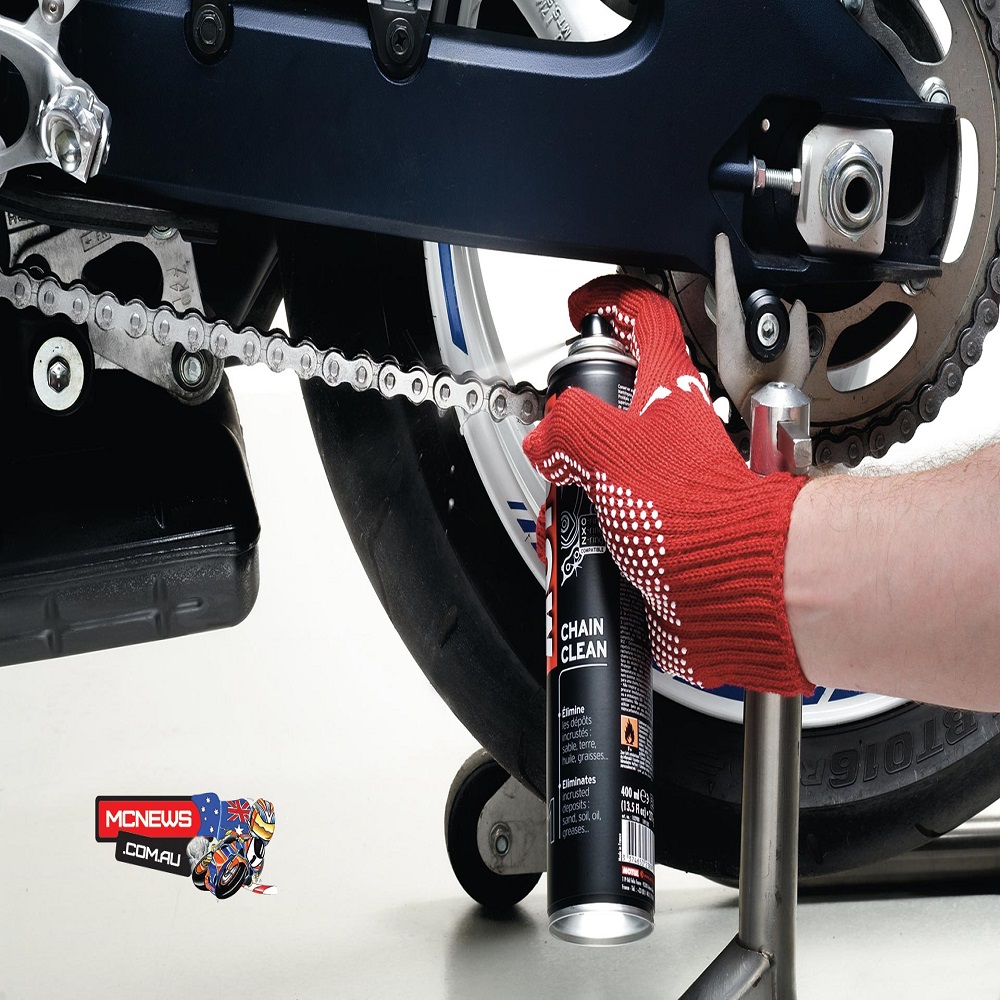
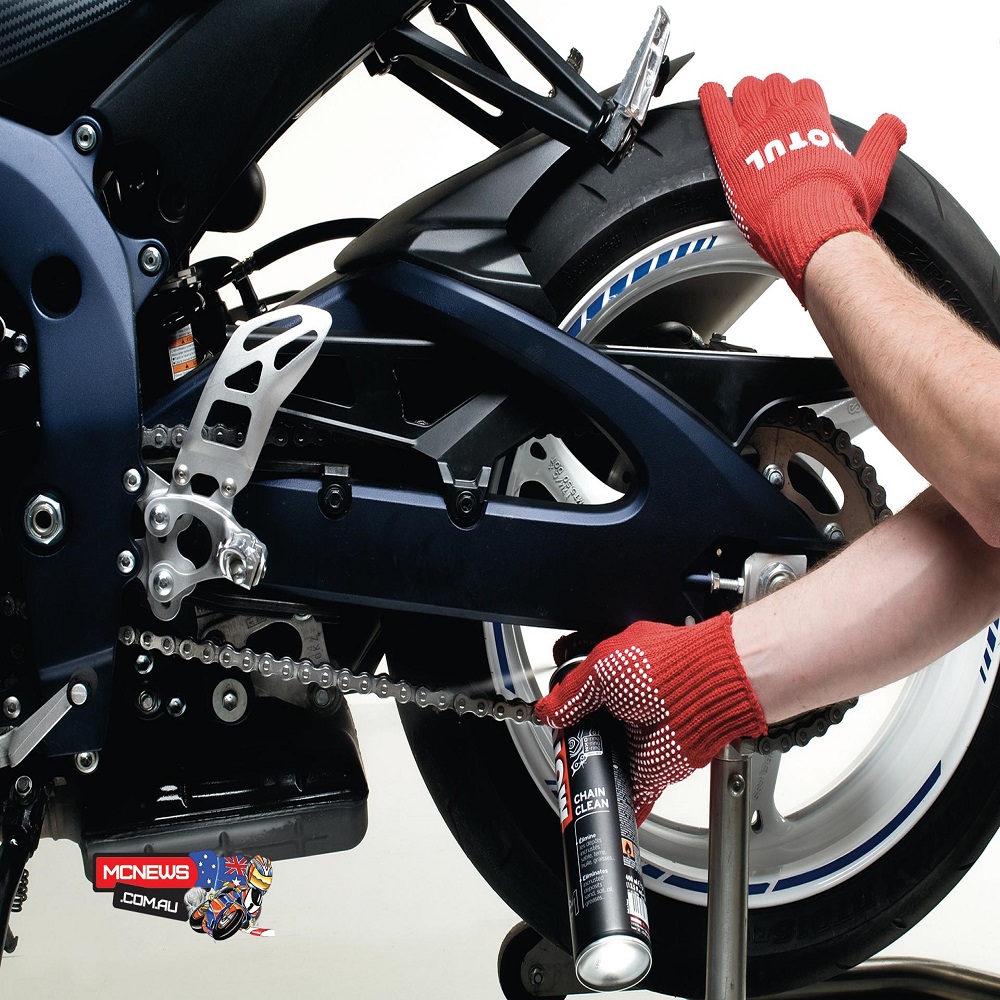
Apply Chain Cleaner
Wearing gloves and eye protection, apply the chain cleaner liberally to the entire length of the chain, ensuring each link is thoroughly soaked. Let it sit for a few minutes to break down grime and dirt.
Scrub the Chain
Using your chain brush, scrub each link of the chain thoroughly, paying close attention to areas where debris tends to accumulate. For stubborn grime, you might need to reapply the cleaner and scrub again or use a degreaser. Use an old toothbrush or detailing brush to clean hard-to-reach areas like the chain rollers.
Rinse and Dry
If your cleaner requires rinsing, use a low-pressure stream of water or a gentle spray bottle filled with clean water to rinse off all cleaner residue. Avoid high-pressure washers, as they can force water into the chain’s seals and bearings. Wipe the chain dry with a clean rag or let it air-dry for a short while.
Re-Lubricate the Chain
Once the chain is completely dry, apply your chosen motorcycle chain lubricant to each link as you rotate the wheel. Be generous but avoid over-saturation, which can attract more dirt. Allow the lubricant to seep into the chain for a few minutes before wiping off any excess with a clean rag. This step is crucial as it prevents rust and ensures smooth operation.
Final Inspection
After everything is done, give your chain one last visual inspection. Check for any loose or damaged links, and ensure the lubrication has been evenly distributed. It’s also a good practice to check chain tension and adjust if necessary according to your motorcycle’s manual.
Maintenance Schedule
Regular chain cleaning should be part of your motorcycle maintenance routine. Depending on riding conditions, aim to clean and lubricate your chain every 300-500 miles or after riding in wet or muddy conditions. Consistency is key to maintaining a healthy chain.
Why Clean Your Motorcycle Chain?
Regularly cleaning your motorcycle chain offers several benefits:
- Extended Chain Life: Removing dirt, grime, and debris prevents premature wear and tear on the chain and sprockets.
- Smooth Operation: A clean chain reduces friction, allowing for smoother gear changes and overall operation.
- Improved Performance: Properly maintained chains contribute to better fuel efficiency and power transmission.
- Safety: A well-maintained chain decreases the risk of malfunctions that could lead to accidents.
Tools and Materials Needed:
Before starting, gather these tools and materials:
- Chain Brush: Specifically designed for cleaning motorcycle chains, these brushes have sturdy bristles that reach into tight spaces.
- Degreaser: Choose a quality motorcycle chain degreaser or a solvent that effectively breaks down grease and grime.
- Chain Cleaning Device: Optional but useful, these tools clamp onto the chain and rotate it through brushes while applying degreaser.
- Rags or Microfiber Cloths: For wiping down excess dirt and degreaser.
- Chain Lube: Essential for re-lubricating the chain after cleaning.
- Brushes and Toothbrushes: Small brushes or toothbrushes can help clean hard-to-reach areas.
- Gloves: Protect your hands from chemicals and dirt.
Step-by-Step Guide to Cleaning Your Motorcycle Chain:
Follow these steps for a thorough chain cleaning:
Preparation
- Warm Up the Chain: Ideally, clean the chain after a ride when it’s warm but not hot. This helps loosen grime.
- Secure the Bike: Use a center stand or paddock stand to elevate the rear wheel, allowing easy access to the chain.
- Protect Surrounding Areas: Cover sensitive parts like exhaust pipes and bodywork to prevent damage from splashing degreaser.
Initial Cleaning
- Apply Degreaser: Spray or brush degreaser onto the chain, focusing on the rollers and links where dirt accumulates.
- Let It Sit: Follow the manufacturer’s instructions regarding dwell time. Typically, a few minutes are sufficient to break down stubborn grime.
Scrubbing
- Use a Chain Brush: Scrub the chain with a dedicated chain brush, working on small sections at a time. Rotate the wheel to expose the entire chain.
- Detailing: Use smaller brushes or toothbrushes to clean sprockets, chain sliders, and other hard-to-reach areas.
Rinse and Wipe
- Rinse Off Degreaser: Use a clean rag dampened with water to wipe off the degreaser and dissolved grime. Repeat if necessary until the chain looks clean.
- Dry Thoroughly: Allow the chain to air dry or use a clean rag to dry it completely to prevent water spots.
Lubrication
- Apply Chain Lube: Once the chain is dry, apply motorcycle-specific chain lubricant evenly across the entire length. Rotate the wheel to ensure thorough coverage.
- Excess Removal: Wipe off excess lube with a rag to prevent flinging during riding.
Final Inspection
- Check Tension: Verify chain tension and adjust if necessary according to your bike’s specifications.
- Inspect for Wear: While cleaning, inspect the chain for signs of wear such as stiff links, excessive slack, or visible damage. Replace if needed.
Maintenance Tips:
- Regular Schedule: Clean and lubricate your chain every 500-1000 miles or sooner if riding in adverse conditions.
- Avoid Over-Lubrication: Excess lubricant attracts dirt and can cause chain wear.
- Quality Products: Use motorcycle-specific cleaners and lubricants for best results and to prevent damage to seals and o-rings.
Cleaning the Chain
- Apply Chain Cleaner: Spray the chain cleaner liberally over the entire length of the chain, focusing on the rollers and the area between them where dirt accumulates.
- Use a Brush: With your soft brush or chain cleaning tool, scrub each link thoroughly to remove grime and debris. Rotate the rear wheel slowly to access all parts of the chain.
- Let It Sit: If your cleaner instructions recommend it, allow the cleaner to sit for a few minutes to break down stubborn dirt.
- Rinse (if applicable): Some cleaners require rinsing with water. Use a low-pressure stream of water to wash away the cleaner and loosened debris, being careful not to direct water at the sprockets or bearings.
- Dry: Use a clean rag to wipe down the chain and ensure it’s completely dry before lubing.
Lubricating the Chain
- Apply Lubricant: Start by applying lubricant to the inside of the chain, focusing on the rollers as they rotate. Apply a steady stream while rotating the wheel slowly to ensure even coverage.
- Wipe Excess: Once the lubricant has been applied, use a clean rag to wipe off any excess from the outside of the chain. This prevents the accumulation of dirt and dust.
- Let It Settle: Allow the lubricant to settle into the chain for a few minutes before riding.
Post-Cleaning Checks
- Check Tension: After cleaning and lubricating, check your chain’s tension according to the manufacturer’s specifications. Adjust if necessary.
- Inspect for Damage: While the chain is clean, inspect it for signs of wear, such as stretched links or damaged rollers. Replace the chain if it’s overly worn.
In conclusion
Keeping your motorcycle chain clean and well-maintained not only enhances its performance and longevity but also contributes to overall riding safety. By following these steps diligently, you’ll ensure a smoother, safer ride every time you hit the road.
Leave a Reply