
Introduction
If you’re considering enhancing your vehicle’s appearance or improving comfort during hot weather, installing car window tint film can be an outstanding choice. Tinted windows not only provide aesthetic appeal but also offer numerous benefits. These include reduced glare, enhanced privacy, and protection from harmful UV rays. As an added bonus, DIY installation can be both cost-effective and enjoyable, allowing you to take control of the process. In this guide, we will explore how to install car window tint film at home, providing step-by-step instructions for achieving a perfect, bubble-free finish.
Understanding the Best Car Window Tint Film Options Available
When selecting the best car window tint film options available, it’s essential to consider the various types of films on the market. Different materials serve various purposes, so knowing the distinctions can help you make an informed choice. Primarily, you’ll come across three types of films: dyed, metallized, and ceramic.
- Dyed Films: These are made with a layer of dye and are typically the most affordable option. They reduce glare and enhance privacy. However, they may not be as effective in blocking heat compared to other options.
- Metallized Films: This type contains tiny metallic particles that reflect heat and UV rays. While they offer better performance than dyed films, they can interfere with electronic signals, which is something to consider if your vehicle has keyless entry or GPS systems.
- Ceramic Films: Ceramic films represent the most advanced choice, offering superior heat rejection without interfering with signals. They are more expensive but provide excellent clarity and durability. Your choice depends on your specific needs and budget.
Preparing for the Installation Process
Importance of Proper Preparation:
-
- Recognize that adequate preparation is essential for a successful installation of car window tint film at home.
- Understand that taking the time to prepare properly can significantly affect the quality and durability of the tint application.
Gather Necessary Tools:
-
- Begin by collecting all the tools you’ll need for the installation. This will help streamline the process and reduce frustration.
- Utility Knife: A sharp utility knife is crucial for cutting the tint film accurately.
- Squeegee: This tool will be used to apply the film smoothly and remove any bubbles or excess water during the installation.
- Spray Bottle with Soapy Water: Prepare a spray bottle filled with a mixture of water and a few drops of mild soap. This solution helps to wet the glass and gives you flexibility to reposition the film as needed.
- Microfiber Cloth: A soft microfiber cloth is essential for cleaning the windows and wiping away any residues without scratching the glass.
- Begin by collecting all the tools you’ll need for the installation. This will help streamline the process and reduce frustration.
Create a Clean Working Environment:
-
- Ensure that the area where you will be working is clean and organized to prevent dust and debris from interfering with the installation process.
- Make adjustments to your workspace by moving away any unnecessary items and ensuring good lighting so you can see the details clearly.
Clean the Car Windows:
-
- Before applying the tint, it is vital to have clean windows. Start by thoroughly washing the windows with a suitable glass cleaner.
- Use the microfiber cloth to wipe the windows, ensuring that no dirt, dust, or grease remains on the surface. A spotless surface is crucial for a successful application.
Dry the Windows Completely:
-
- After washing, make sure to dry the windows thoroughly. Any moisture left on the glass can interfere with the adhesion of the tint film.
- Inspect the windows carefully to ensure that they are completely dry before moving on to the next step.

Step-by-Step Installation Guide
Now that you’re prepared, let’s discuss the installation process for car window tint film. This guide will focus on achieving a bubble-free finish, which is an essential aspect of a successful tint job.
Measure and Cut the Film:
-
- Begin by accurately measuring the dimensions of the window you intend to tint.
- Take note of the height and width of the window frame.
- Add an extra inch (or about 2.5 cm) to each side of your measurements. This additional film will provide a buffer, ensuring you have enough material to work with and allowing for adjustments during the application.
- Using a pair of sharp scissors or a utility knife, carefully cut the film to match these modified dimensions, ensuring clean, straight edges for a professional look.
Wet the Window:
-
- Prepare a soapy water solution by mixing a few drops of mild dish soap with water in a spray bottle.
- Lightly spray the soapy solution onto the surface of the window where the film will be applied. Be generous but avoid soaking the glass excessively.
- The soapy water will create a slippery surface that will assist in adhering the film better. It also allows for more flexibility as you position and reposition the film.
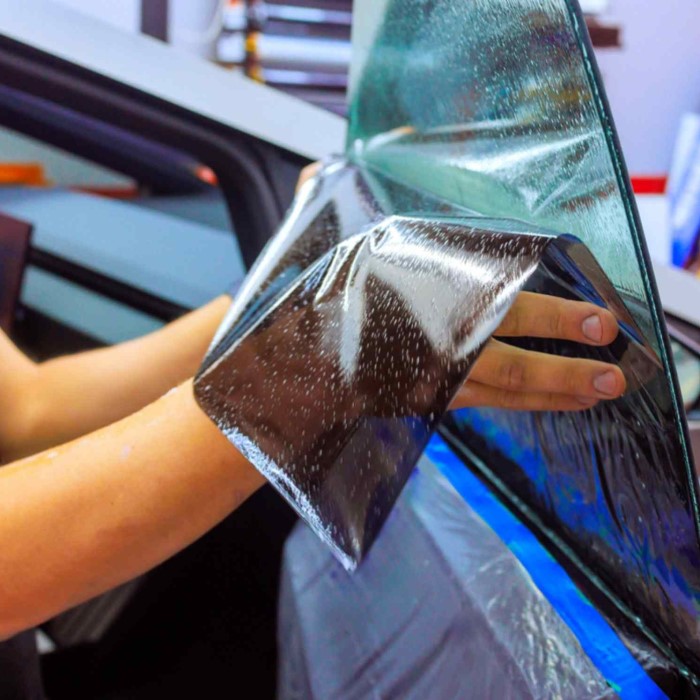
Apply the Film:
-
- Begin the application by carefully peeling off the backing from the film, taking care not to touch the adhesive side to avoid contamination.
- Position the film against the wet window, ensuring the sticky side is facing the glass. Align the edges of the film evenly with the window frame.
- Once the film is positioned, take your squeegee, and starting from the center, gently press the film against the glass. Gradually work your way outwards toward the edges.
- As you squeegee, systematically eliminate any air bubbles by pushing them towards the edges. This step is crucial for a smooth, bubble-free finish.
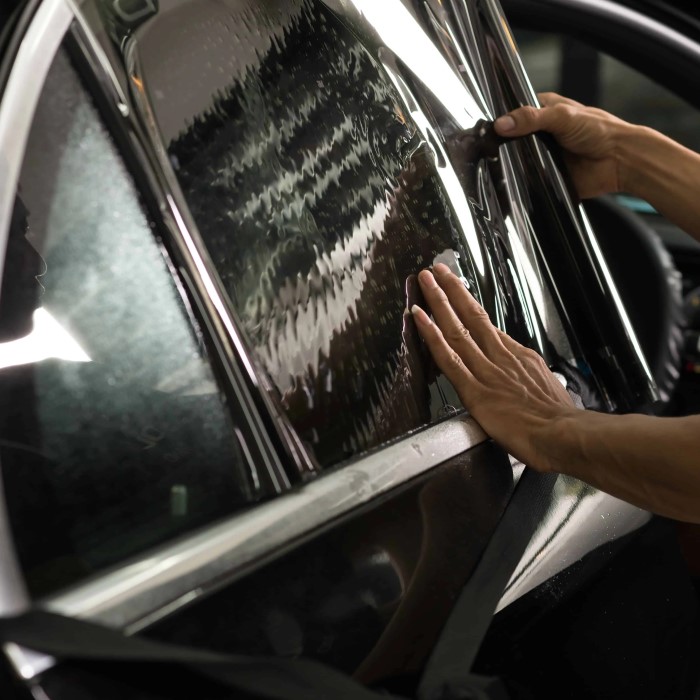
Trim the Edges:
-
- After the film is securely applied to the window, take your utility knife and carefully trim away any excess film around the edges.
- Pay close attention to the alignment of the film with the window frame to ensure a neat and tidy appearance.
- Aim for a smooth finish that aligns perfectly, as this will enhance the overall look of your tinted window.
Final Touches:
-
- Once all excess film has been trimmed away, use the squeegee again to carefully go over the entire surface, ensuring that any remaining air bubbles are removed.
- Press firmly but gently, checking for any spots that may need additional smoothing.
- A well-executed application will not only improve the aesthetic of your window but will also help ensure the longevity and effectiveness of the film.
By following these steps methodically, you can achieve a professional-quality window tinting result.
Troubleshooting Common Issues
It’s not uncommon to face challenges while applying car window tint film. Bubbles are often the most common issue, but they can usually be fixed if caught early on. If you notice them during application, gently lift a corner of the film and use your squeegee to push the bubble out. If the bubble remains, you can try to prick it with a pin and push the air out.
Alternatively, if you encounter wrinkles, it may be best to remove the film entirely and try again. Ensuring you follow the installation steps closely can help minimize errors and guarantee a successful outcome.
Legal Considerations: Car Window Tint Film Laws by State
Before you proceed with your car window tinting project, it’s essential to familiarize yourself with car window tint film laws by state. Regulations vary widely, including allowable darkness levels and the types of windows that can be tinted. For example, some states impose stringent laws on the windshield, while others allow greater flexibility in rear windows.
Failing to comply with state laws can lead to fines or, in some cases, requiring the removal of tint. It’s advisable to check the legal requirements specific to your state before installation to avoid complications in the future.
Benefits of Using Car Window Tint Film
Using car window tint film provides various advantages that enhance your driving experience. Firstly, it helps reduce heat buildup within the vehicle, making your ride more comfortable during hot weather.
Secondly, tinted windows offer greater privacy and security, deterring potential theft. Additionally, they protect the vehicle’s interior from sun damage, preserving upholstery and reducing fading. Finally, tinted windows can block harmful UV rays, which can have adverse health effects over time.
Frequently Asked Questions
- Is it illegal to have tinted windows in Singapore?
In Singapore, there are strict regulations regarding window tinting. Front windshields must allow at least 70% of light to pass through, while side and rear windows have different limits. It’s essential to comply with local laws to avoid fines. - How long does tinted window film last?
The lifespan of tinted window film varies based on the quality of installation, the film used, and environmental factors. Generally, high-quality films can last anywhere from five to eight years, while lower-quality options may need replacement sooner. - Is 20% or 35% tint darker?
A 20% tint allows 20% of light to pass through, making it darker than 35%, which allows 35% of light. Therefore, a 20% tint is indeed darker than a 35% tint. - Which is better, ceramic tint or 3M tint?
Both ceramic and 3M tints offer excellent UV protection, but ceramic tints typically provide superior heat rejection. 3M is known for its quality and innovation, making them both excellent choices. Your preference may depend on specific needs and budget.
Conclusion: Achieving the Perfect Finish
Installing car window tint film can be a rewarding DIY project if done correctly. By following the steps outlined, you can achieve a beautiful, bubble-free finish that enhances your vehicle’s aesthetic and comfort. Remember to prepare adequately, understand the different film options, and stay informed about legal considerations. Whether you’re considering the benefits of using car window tint film or exploring car window tint film vs spray tint, being informed will empower you to make the best decision for your vehicle. With patience and attention to detail, your tinted windows will look fantastic, giving you pride in your DIY accomplishment.
Leave a Reply