Introduction
Your car’s headlights take a beating. Sun exposure causes oxidation. Road grime scratches the surface. Over time, the plastic turns yellow or cloudy. This reduces light output. It makes night driving dangerous. Therefore, restoring them is important. This guide covers how to use the best headlight restoration kit. We review the best headlight restoration kit for cloudy headlights. We provide affordable best headlight restoration kit reviews. This article is for best headlight restoration kit for DIY enthusiasts. It also covers the best headlight restoration kit for cars with yellowing lenses. Our goal is to help you see clearly again.
A good restoration kit saves money. New headlight assemblies cost hundreds. A kit costs much less. It also takes little time. Most kits include sandpaper, polish, and a sealant. Some include a drill attachment. This speeds up the process. In 2026, many kits are available. Choosing the right one matters. We explain the science behind the products. We also answer common questions. Read on to learn more.
The Science Behind Headlight Oxidation
Headlight lenses are usually polycarbonate plastic. This material is lightweight. It is also impact resistant. However, it has a downside. It is porous. Manufacturers apply a clear coat. This protects against UV rays. Over time, the clear coat wears off. The plastic is then exposed. UV light breaks down the polymer chains. This causes yellowing. Oxygen reacts with the plastic. This causes cloudiness.
The process is called photo-oxidation. It happens gradually. Heat speeds it up. So does road salt. Once the surface becomes rough, light scatters. The headlight appears dim. Therefore, restoration must remove the damaged layer. You need to sand the surface smooth. Then, you apply a new protective coating. The best headlight restoration for cloudy headlights includes these steps. It has abrasives to cut the plastic. It also has a UV sealant. Without the sealant, the lens will yellow again quickly. So, the kit is a complete system.
What Makes a Kit the Best Headlight Restoration Kit?
Not all kits are equal. The best headlight restoration kit has several features. First, it includes multiple grits of sandpaper. You start with a coarse grit. Then, you move to finer grits. This removes deep scratches. It also smooths the surface. Second, it has a high-quality polishing compound. This brings back the clarity. Third, it includes a UV sealant. This protects the lens for years. Some kits use a spray sealant. Others use a wipe-on formula.
Fourth, the kit should include a drill attachment. This saves effort. It also produces better results. Manual sanding takes longer. It can also be uneven. Fifth, the kit should have clear instructions. Good kits also include a foam applicator. This helps with even application. For best headlight restoration kit for cars with yellowing lenses, look for a kit with strong abrasives. Yellowing is deep. You need to remove more material. For best headlight restoration kit for DIY enthusiasts, ease of use is key. A simple kit with fewer steps works well. In summary, choose a complete kit.
How to Use the Best Headlight Restoration Kit Correctly
Using the best headlight restoration kit is a straightforward process if you follow these steps carefully. Here’s a detailed breakdown of the procedure to achieve clear, bright headlights:
Wash the Headlights:
-
- Begin by thoroughly washing the headlights to remove any dirt, grease, or debris.
- Use a mixture of soap and water for a deeper clean.
- After washing, dry the headlights with a clean, soft cloth to prepare them for the restoration process.
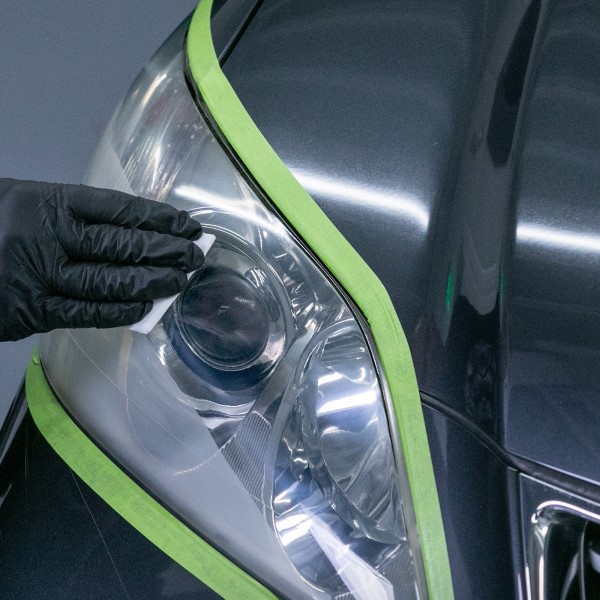
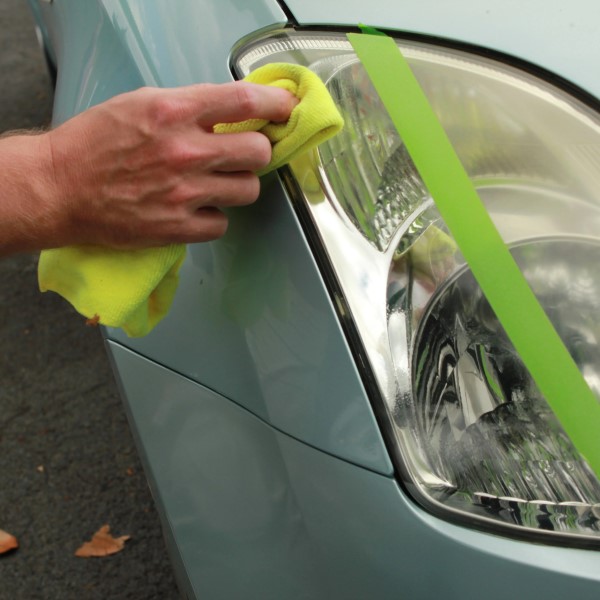
Tape Off the Surrounding Paint:
-
- Use automotive masking tape to tape off the area around the headlights.
- This precaution helps prevent scratches or damage to the vehicle’s paint while you work on the headlights.
Start with Coarse Grit Sandpaper:
-
- Begin the sanding process using coarse grit sandpaper.
- Apply water as a lubricant during this step. Keeping the surface wet helps achieve better results and reduces dust.
- Sand the lens in a crosshatch pattern, ensuring you apply even pressure.
- Continue sanding until the yellow, oxidized layer is completely removed, and the surface appears uniform.
Move to Medium Grit Sandpaper:
-
- After the coarse grit stage, switch to medium grit sandpaper.
- Repeat the sanding process, maintaining the same wet conditions.
- At this stage, the lens should have a frosted appearance but should be even all around.
Use Fine Grit Sandpaper:
-
- Next, use fine grit sandpaper to refine the lens further.
- This step is essential for removing any scratches left by the medium grit sandpaper.
- By the end of this stage, the lens should feel smooth to the touch and look clearer.
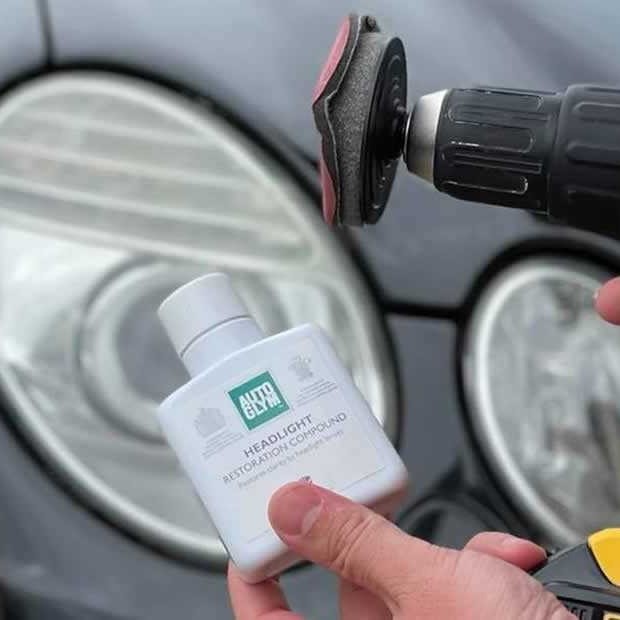
Apply the Polishing Compound:
-
- After sanding, it’s time to apply the polishing compound to restore clarity.
- You can use a drill attachment for faster results or apply it with a clean cloth for more control.
- Buff the lens thoroughly until it achieves a clear, polished finish.
Apply the UV Sealant:
-
- To protect your newly restored headlights, apply a UV sealant as the final step.
- Carefully follow the product’s instructions for application and curing time.
- Allow the sealant to cure for the recommended duration to ensure maximum protection against future oxidation.
Additional Tips
- Remember that a slow and steady approach yields better results. Rushing through the process can lead to uneven surfaces and less effective restoration.
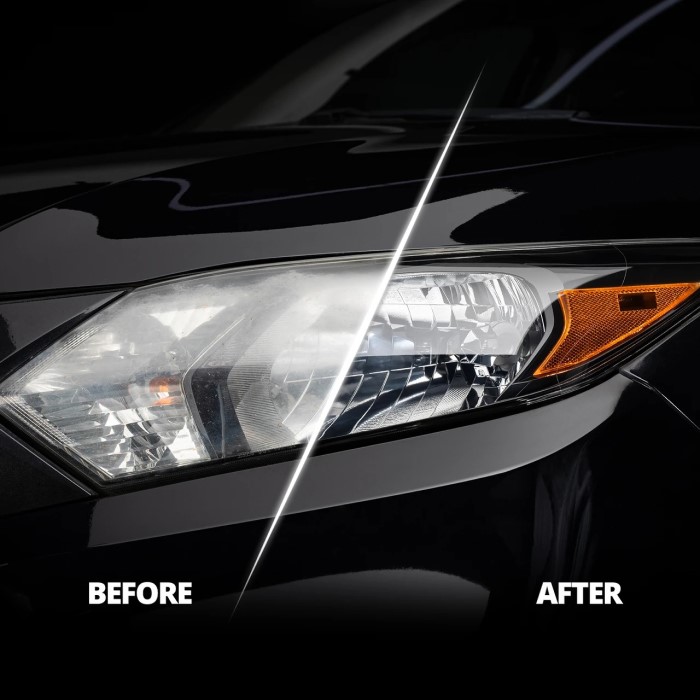
- If you follow these steps with care, you can effectively use the best headlight restoration kit for cloudy headlights, resulting in improved visibility and a more attractive appearance for your vehicle.
Do Headlight Restoration Kits Really Work?
Yes, they do. However, results depend on the quality of the kit. They also depend on your effort. A good kit with proper technique can restore lenses to like-new condition. The key is to remove the oxidized layer. Then, you must seal the lens. Many people skip the sealant. Then, the lenses yellow again in a few months. Therefore, use the sealant.
Kits with a drill attachment work faster. They also produce a more uniform finish. Manual kits work fine. They just take longer. For heavily damaged lenses, you may need a second treatment. Some lenses have deep pitting. These may not fully restore. In that case, replacement is the only option. But for most cars, restoration works. Many affordable best headlight restoration kit reviews confirm this. Users report great results. The lights become bright again. night driving becomes safer. Therefore, restoration is a good investment.
Which Is the Top Rated Headlight Restoration Kit?
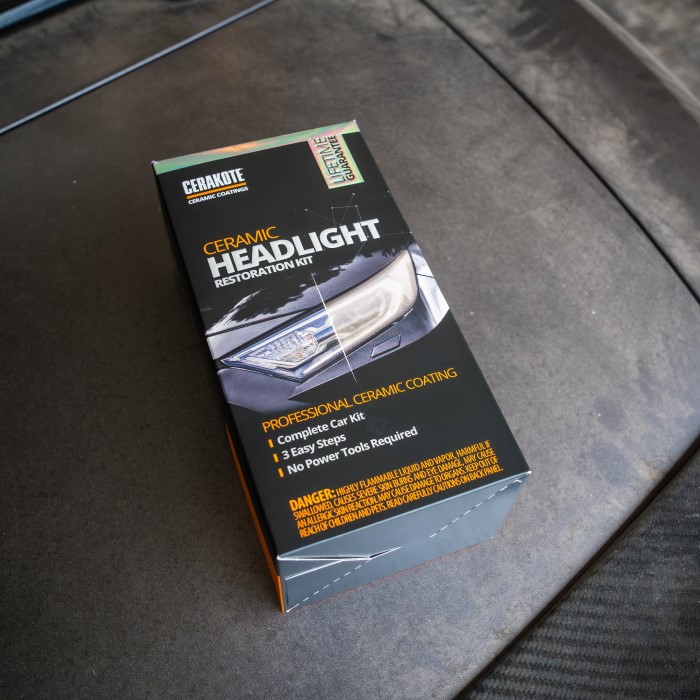
Several brands are top rated. Among them, Cerakote Ceramic Headlight Restoration Kit is a favorite. It uses ceramic coating. This lasts longer. It also resists UV better. Another top choice is the 3M Headlight Restoration Kit. It works with a drill. This is easy to use. The Sylvania Headlight Restoration Kit is also popular. It includes a UV-blocking sealant. It works well for mild to moderate oxidation.
For the best headlight restoration kit for cars with yellowing lenses, Cerakote is a strong option. Its ceramic coating provides excellent protection. For the best headlight restoration kit for DIY enthusiasts, the 3M kit is simple. You only need a drill. The process is straightforward. Read affordable best headlight restoration kit reviews before buying. The price often reflects the quality of the sealant. In conclusion, choose a kit with good reviews. It will give you the best results.
Common Myths: Does WD-40 Really Clean Headlights?
Many people ask about WD-40. It is a popular home remedy. You spray it on the lens. You wipe it off. The headlight looks clear for a short time. However, this is temporary. WD-40 is a solvent. It dissolves the yellow layer. It does not remove it. The dissolved layer sits on the surface. It dries quickly. The yellow comes back. Sometimes it gets worse. Therefore, WD-40 is not a real solution.
Another myth is toothpaste. Toothpaste contains mild abrasives. It can polish the lens lightly. However, it is not strong enough to remove deep oxidation. It also lacks a sealant. Therefore, the results are short-lived. The only reliable method is to sand, polish, and seal. A proper best headlight restoration kit does all three. It restores clarity permanently. So, avoid shortcuts. Use the right tools.
Conclusion: Choose the Right Kit and Restore Your Lights
In conclusion, restoring your headlights is a simple DIY project. You just need the right tools. This guide covered how to use the best headlight restoration kit. We reviewed the best headlight restoration kit for cloudy headlights. We shared affordable best headlight restoration kit reviews. This article is tailored for best headlight restoration kit for DIY enthusiasts. It also helped with best headlight restoration kit for cars with yellowing lenses. Now you have the knowledge.
Pick a kit that matches your needs. Follow the steps carefully. Do not skip the sealant. Take action today and revive your headlights.
Leave a Reply