Why Aiming Headlights Matters for Safety
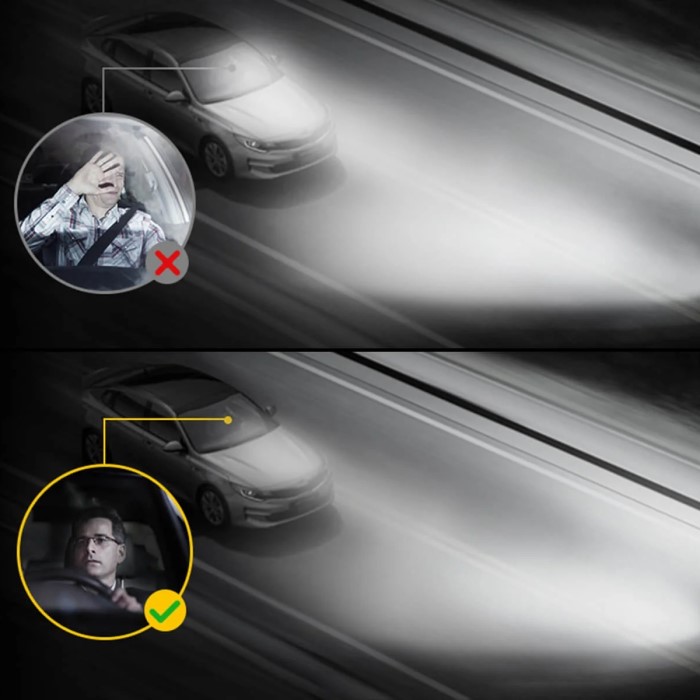
Aiming headlights is often overlooked. Many drivers never check them. This is a mistake. Proper alignment affects how you see the road. It also affects how others see you. Headlights that point too low reduce visibility. You cannot spot hazards early. Headlights that point too high blind oncoming traffic. This causes accidents. Legal issues arise too. Police ticket drivers with misaligned lights. Insurance claims may get denied. So alignment is serious. It is not just about your view. It is about everyone’s safety.
You need to understand how to aim headlights properly. Many people guess. They twist a screw randomly. This rarely works. A systematic approach is better. You measure distances. You adjust carefully. The process takes only 30 minutes. Yet it saves lives. Consider foggy or rainy nights. Poor alignment makes these conditions worse. Your light beam scatters. It reflects off fog. You see less. Correct alignment cuts through fog better. It projects light where you need it. So do not neglect this task. Check your headlights every six months. After a bumpy road, check again. After a collision, definitely check. Make it a habit. Your family and other drivers depend on you. With proper aiming, night driving becomes easier. You feel more confident. You reduce fatigue. Your eyes strain less. So invest time in aiming headlights. It pays off.

Common Mistakes When Aiming Headlights
Many people make errors. One big mistake is using a flat surface. You need a level surface. A driveway slope ruins measurements. Always park on level ground. Another mistake is forgetting the vehicle load. Heavy cargo changes headlight angle. Adjust with normal load. Remove extra weight. Or simulate it with sandbags. This ensures accuracy. A third mistake is ignoring the manual. Each car has specifications. The manual tells you the correct height. It also shows adjustment points. Ignoring this leads to poor results. A fourth mistake is using wrong tools. Some use a hammer. This damages the housing. Use proper tools. Screwdrivers or socket wrenches work. A fifth mistake is over-adjusting. Small turns make big differences.
Turn the adjuster half a turn. Then check. Repeat slowly. Patience is key. A sixth mistake is adjusting only one side. Always adjust both side by side. Uneven alignment causes imbalance. A seventh mistake is forgetting to clean the lens. Dirt diffuses light. Clean before aiming. You get accurate results. An eighth mistake is doing it in daylight. You cannot see the beam well. Do it at dusk or night. Use a wall as a target. A ninth mistake is not marking the wall. Use tape to mark the center. This gives a reference. Finally, skipping the test drive. After adjusting, test on a dark road. See if the beam feels right. These mistakes are common. But they are easy to fix. Learn from them. Your aiming headlights job will improve.
How to Aim Headlights Properly Step by Step
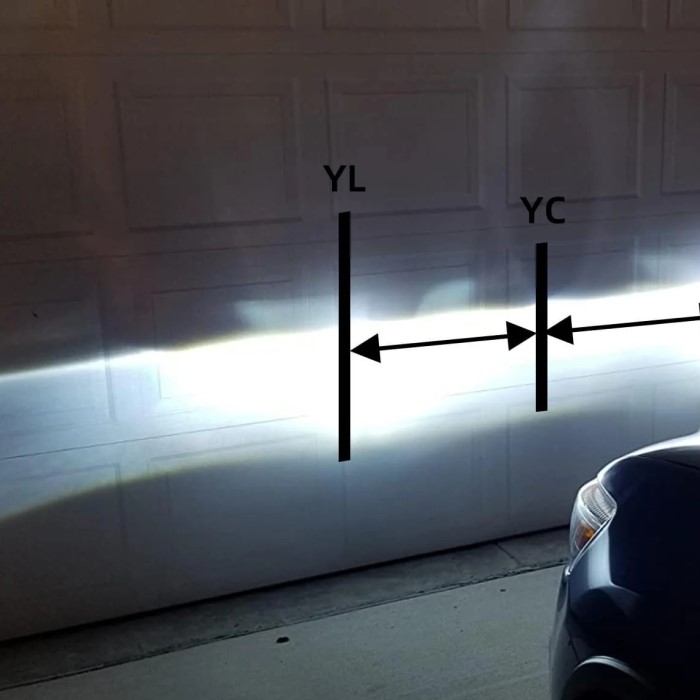
Follow this procedure for perfect alignment. Start with preparation. Park your car on level ground. Face a wall 25 feet away. Measure the distance. Use a tape measure. Mark a vertical line on the wall. Align it with the car’s center. Turn on your low beams. Identify the beam center. The beam should hit slightly below the headlight height. Most cars have a spec of 2 to 4 inches drop. Check your manual to be sure. Now, locate the adjustment screws. They are on the headlight housing. Some have two screws. One for up and down. Another for left and right. Use the tool from your kit. Turn the vertical screw slowly. Adjust until the beam reaches the correct height. Then adjust horizontal. The beam should be straight ahead.
Not pointing left or right. Check the other side. Repeat the process. Both sides must match. Use a level on the car. Ensure it is even. After adjustment, tighten the screws. Do not overtighten. They can strip. Now, test your work. Drive on a flat road. The beam should illuminate the road ahead. Not the trees. Not the ground too close. If you see glare from other drivers, adjust again. You may need to lower both sides. A final tip: use the driver seat weight. Have someone sit in the driver seat. This simulates real conditions. You can also add weight for your common load. This step ensures accuracy. With practice, how to aim headlights properly becomes easy. You save money on mechanic fees. You also gain peace of mind.
Tools for Aiming Headlights
You do not need expensive equipment. Basic tools work well. First, a tape measure. It measures distance to the wall. Second, a level. It checks the car’s stance. A bubble level is fine. Third, a screwdriver or socket wrench. Check your headlight type. Some use Phillips screws. Others use hex bolts. Fourth, masking tape. Mark positions on the wall. Fifth, a wall or garage door. It must be flat and vertical. Sixth, a helper is useful. They can sit in the car. They can watch the beam. Seventh, a chalk line. It draws vertical marks. Eighth, a flashlight. It helps you see the adjustment screws. Ninth, a rag. Clean the headlight lens first. Tenth, your vehicle manual. It gives specs. For more precision, use a laser level. It projects a line.
This helps measure height. Some pro shops use a headlight aiming machine. But for home use, simple tools suffice. You can also download apps. They measure angle using your phone. These are convenient. But they are not as accurate as a wall test. Trust the wall method. It has been used for decades. Remember, tools for aiming headlights are inexpensive. You probably own most of them. So do not delay. Gather your tools. Learn the headlight alignment procedure. You will be glad you did.
The Headlight Alignment Procedure in Detail
The headlight alignment procedure is systematic. First, prepare your vehicle. Fill the gas tank. This adds normal weight. Check tire pressure. Low tires change height. Inflate to spec. Remove heavy cargo. Except for your usual load. Next, find a level surface. A garage floor works. Mark a spot 25 feet from the wall. Use chalk. Position the car. Make sure it is square to the wall. Turn on low beams. Observe the beam pattern. There should be a distinct cutoff line. It is a sharp line where light ends. This line should be below the headlight center. Measure the distance from the floor to the cutoff. Compare it to the spec in your manual. Usually, it is 2 inches lower per 25 feet. Adjust the vertical screw until the cutoff matches.
Then check the horizontal aim. The beam should be straight. Not angled left or right. If it is off, adjust the horizontal screw. Do one side at a time. Cover the other side with cardboard. This prevents confusion. Work on the driver side first. Then the passenger side. The passenger side should be slightly lower. This prevents glare for oncoming traffic. Many cars have a slight offset. Check your manual. After adjustment, test the high beams. They should also point straight. High beams are usually higher. But they should not point to the sky. If they do, low beams need rechecking. Finally, secure the adjustment screws. Some have locking nuts. Tighten them. This is a complete procedure. It takes about an hour the first time. You get faster with practice. The headlight alignment procedure is not hard. Take your time. Accuracy matters.
Signs Headlights Need to Be Aimed
Recognizing the signs is easy. First, other drivers flash their lights at you. This means you are blinding them. It is a clear sign. Second, you struggle to see the road. The light seems too dim or too close. Third, the beam hits the ground right in front of the car. Fourth, the beam illuminates treetops. This means it is too high. Fifth, you notice an uneven pattern. One light points left. The other points right. Sixth, you feel eye strain at night. Poor alignment forces your eyes to adjust. Seventh, your low beams seem like high beams. Eighth, you have recently hit a pothole or curb. The impact can knock them out. Ninth, you replaced a headlight bulb. New bulbs may need adjustment. Tenth, you notice visible damage to the housing.
Cracks or loose parts change alignment. Eleventh, your car has been in a collision. Even a minor fender bender shifts alignment. Twelfth, your car is old. Suspension wear changes height. This affects headlights. Thirteenth, you changed your tires. Different size tires change ride height. Fourteenth, you added a lift kit or lowered the car. This changes geometry. Alignment must be redone. If you notice any of these signs, act quickly. Do not wait. Check your headlights. Use the methods in this guide. You can diagnose the issue. Then fix it. Early detection saves money. It also prevents accidents. Watch for those signs headlights need to be aimed. Stay proactive.
Common Questions About Aiming Headlights
Many drivers have questions. One common question is about legality. Is it legal to adjust your own headlights? Yes, it is legal. But you must follow regulations. Each country has limits. In the US, the DOT sets standards. Your aim must stay within range. Check local laws. Another question is about forgetting the wall measurement. Can you use a different distance? Yes, but you need to recalculate. The beam drop changes with distance. Stick to 25 feet for simplicity. Some ask if LED headlights need special care. LED lights have sharp cutoff lines. They are easier to adjust. But they are also brighter. So precise aiming is crucial. Another question is about telling if you have the right tool. Most cars use a 6mm or 8mm socket.
Some use a Phillips screwdriver. Check your manual. If you lose the tool, buy a generic one. Autoparts stores sell them. Some drivers worry about stripping the screw. Use the correct size. Apply steady pressure. If it is stuck, use penetrating oil. Another concern is doing it alone. Yes, you can do it alone. Use a level and mark the wall. Then sit in the driver seat. Get out and check. Repeat. It takes longer but works. Finally, drivers ask about cost. Professional alignment costs about 50to100. DIY costs zero if you have tools. So DIY is cheaper. But if you are unsure, hire a pro. It is better than a fine. Overall, practical approach to aiming headlights at home is straightforward.
Common Misconceptions About Headlight Alignment
Some myths persist. Myth one: headlights never need adjustment. This is false. Vibration and wear affect them. Check them yearly. Myth two: all cars aim the same. Not true. Each model has different specs. Always consult your manual. Myth three: you can aim by eye. Your eyes are not accurate. A wall test is better. Myth four: higher beams are better. They are not. They blind others. You see less because of glare. Myth five: only old cars need aiming. Modern cars also need it. They have complex lighting.
They are more sensitive. Myth six: using a level is optional. A level ensures even ground. It is essential. Myth seven: you can aim in the rain. Rain reflects light. It distorts the beam. Wait for dry weather. Myth eight: bulb replacement does not affect alignment. It does. New bulbs may sit differently. Always check after replacement. Myth nine: you only need to aim when replacing headlights. Not true. Any impact or suspension change requires a check. Myth ten: professional aiming is always perfect. Some shops rush. They may still get it wrong. You can verify yourself. Learn to check. This gives you control. Busted myths help you make better decisions. Knowledge is power.
Long-Term Benefits of Properly Aiming Headlights
The benefits extend beyond safety. First, better fuel economy. Yes, good alignment reduces drag. Your car handles better. You save gas. Second, longer bulb life. Misaligned bulbs overheat. They burn out faster. Proper aiming keeps them cool. Third, reduced eye strain. You see clearly. Your eyes relax. Long drives feel shorter. Fourth, increased resale value. A well-maintained car appeals to buyers. They see attention to detail. Fifth, fewer police stops. You avoid fines. Your insurance stays low. Sixth, better nighttime confidence. You drive without fear. You trust your lights. Seventh, improved street sign visibility. Aimed lights read signs earlier. You avoid missed turns. Eighth, less wear on other parts.
Misaligned lights cause you to drive with high beams. This stresses electrical system. Proper alignment reduces strain. Ninth, better illumination in curves. Aimed lights follow the road. Tenth, peace of mind. You know your car is safe. You protect your family. These benefits compound over years. A small effort now pays dividends. So take action today. Learn how to aim headlights properly. Check a guide. Watch a video. Then do it. Your future self will thank you. The road awaits. Make it safer for everyone.

FAQ
What is the proper way to aim headlights?
Park on level ground 25 feet from a wall. Mark the center of the car. Turn on low beams. Adjust the screws so the beam cutoff sits 2-4 inches below the headlight height. Use your manual for exact specs.
How do I know if my headlights are properly aligned?
Drive on a flat dark road. The beam should illuminate the road ahead. Not point at the ground or sky. Other drivers should not flash their lights at you. The beam pattern should be even.
Do headlights need to be aimed?
Yes, they need aiming. Over time, vibration and impacts misalign them. Regular checks keep you safe. Aim them after bulb replacement, suspension work, or a collision.
What happens if headlights are aimed too high?
High beams blind oncoming drivers. This causes accidents. You may also get a ticket. Your visibility suffers because light scatters. Always keep the beam within legal range.
Conclusion: Take Control of Your Headlight Alignment
Aiming headlights is a skill everyone can learn. It saves money and improves safety. You now know the common mistakes. You know how to avoid them. Do not ignore this task. Your nighttime driving depends on it. Your fellow drivers depend on it. Give it a try this weekend. The process is simple. The results are immediate. You will notice the difference. Say goodbye to glare and poor visibility. Embrace clear, safe roads. Start with your car today. Your family will always have a safe trip. Make proper headlight alignment a habit. It is one of the easiest maintenance tasks. But it makes the biggest impact. Drive safe, drive smart.
Leave a Reply